As I mentioned on Instagram, I am currently visiting my mom in Virginia since she recently had a hip replacement. I am here for 11 days total (which includes travel days) and I was determined (as I always am) to only bring a carry-on. Even though it is not always possible, I always try to carry-on…I’m like religious about it and have gotten my boyfriend on the bandwagon as well. I call it ‘living the carry-on life’. Now, before I get messages about this, no, I don’t have kids and I know the carry-on life will not always be possible if or when that happens. But for now, I’m all-in.
What are the benefits of living the carry-on life you ask? Perhaps you took a scroll through this post and are thinking, DAMN, this looks like a well written post. But also, you might be thinking DAMN, that’s a lot of words and this entire process looks inconvenient and time consuming. I would argue that the upfront work pays dividends in avoided inconvenience. Have you ever:
- waited for your checked bag to come out on the conveyer belt at 1am after a 4-hour delay when only a skeleton crew is working and all you want to do is go to bed?
- had to go buy clothes (you don’t even want or like) and toiletries when your bag was lost or delayed on your out-bound trip?
- spent the night in a hotel without any change of clothes or personal toiletries because you missed a connection, or it was canceled, and you couldn’t get your checked bag?
All these scenarios are inconvenient and time consuming and all of them have happened to me. That’s why I promote the carry-on life!

As a management consultant, I traveled for work…like a lot…like every damn week. Except for the two years I was local, I was ‘on the road’ (mostly flying) for my eight and a half years with the company. Every Sunday night I packed my carry-on for my Monday through Thursday commute (I typically worked from home on Fridays). This laid the foundation for me to become the master packer I am now. I’m not great at a lot of things, but I am a damn great packer and I want to help you be one too.
Below are the five steps I take, every time I pack for a trip, and how you can follow them too:
1. Identify your clothes and shoes:
As you get closer to a trip, keep your eye on the weather at your destination. Based on the weather and what you’ll be doing, create a list of what you want to bring about two days before you leave. If you are new to this type of planning, it might be best to plan outfits by day. You can also pull out the clothes you want to bring with you if you are more of a visual person. Don’t forget to include socks and underwear. If you are going somewhere cold, think multiple, thinner layers instead of a single super bulky item. If there is a super bulky item you can’t live without (snow boots for example), wear it on the plane (but be prepared to wear it home too).
2. Edit your clothes and shoes:
Once you have identified what you want to bring, start to edit down/adjust your list/selection. If you are going for more than a couple days, stick to neutrals like black, grey, navy, and white with a few pops of color for interest. When editing your wardrobe, pay attention to the shoes you’re thinking of bringing. I suggest two pairs of shoes max (one of which you will wear while traveling). You can sneak in a third pair if you can fit them in. If you are going away for an extended time, this is not the time to bring those yellow heels you’ve always wanted to wear that go with only that one dress. It’s also not the time to bring along bulky workout shoes with the ‘hope’ that you will work out. If you are a runner or gym rat who will go crazy if they don’t work out (what’s that like by the way?), then definitely pack them and adjust the rest of your items to accommodate. The goal is to wear everything you pack and even re-wear some items on longer trips. If you come home from trips with items you didn’t wear, you are an over-packer! If you are an over-packer, this will likely be the hardest step for you. Living the carry-on life will make you rethink what you bring but I think it’s worth it.
For this trip, I wore a pair of leggings, a short sleeve t-shirt, a sweatshirt and a pair of sneakers on the plane. In addition, I brought the following clothes and shoes in my carry-on:
- 1 pair of nice black pants
- 1 nice blouse
- 3 pairs of jeans
- 2 sweaters
- 2 button down casual shirts
- 2 long sleeve t-shirts
- 3 short sleeve t-shirts
- 4 sweatshirts
- 3 pairs of leggings
- 1 tank top for layering
- underwear and socks
- 1 pair of pajamas
- 1 pair of booties
3. Add accessories:
Now that you have your clothes and shoes set, add some (compact) accessories for interest. Maybe a colored scarf or a cute clutch. This is also the time to identify any jewelry you want to bring. I suggest staying away from any huge statement jewelry or bulky accessories that take up a lot of space unless you have room for it.
4. Pack your toiletries:
If you live in the US or are traveling here, you already know about our liquid restrictions on planes (no single liquid/aerosol/cream/gel/paste container over 100ml/3.4oz and all must fit inside a see-through quart size bag). If you are unfamiliar, google it. If you travel a lot, I suggest you get a heavy plastic, reusable see-through bag and also get TSA PreCheck. In fact, just get Global Entry if you ever plan to travel internationally in the next five years which comes with TSA PreCheck. Believe me, you will thank me. If you have PreCheck, you can leave your approved liquids in your carry-on freeing up space in your personal item. I only want things in my purse that I will actually use on the plane, so my liquids get packed into the carry-on.
Every pharmacy, grocery store, and Target/Walmart equivalent has travel sized toiletries. You should be able to find what you need there. If you want to bring along special shampoo or creams etc. that don’t come in under 100ml sizes, or if you just don’t want to buy something you already have in a smaller size, get some reusable bottles and fill them up with product you already have. These can be found in the same travel sized toiletry sections of the stores previously mentioned. I personally like the Nalgene brand containers I find at The Container Store. They last forever, are great quality and don’t leak. The same can’t always be said for other brands.
If you can’t seem to cram all your liquids into a single bag, make sure you are only putting in non-prescription liquids. This does NOT include contact solution. Contact solution is used for a medical condition and does not count against your single quart size bag. I still suggest only bringing a 100ml bottle size or less (and putting it in a plastic bag should there be a spill) so that your bag doesn’t get flagged going through the screener. Now, even though the law states you need to include all things in the cream/gel/paste category in the quart sized bag, if everything doesn’t fit, I will pull out things like heavy creams, thick foundation and toothpaste and just put them in my makeup bag. Who am I kidding, I actually don’t even bother putting them in the quart sized bag at all. But, I do make sure the size is still 100ml or less and I’ve never been questioned on it. Now, that is just ME. I’m not necessarily telling YOU to do that.
5. Pack your bag:
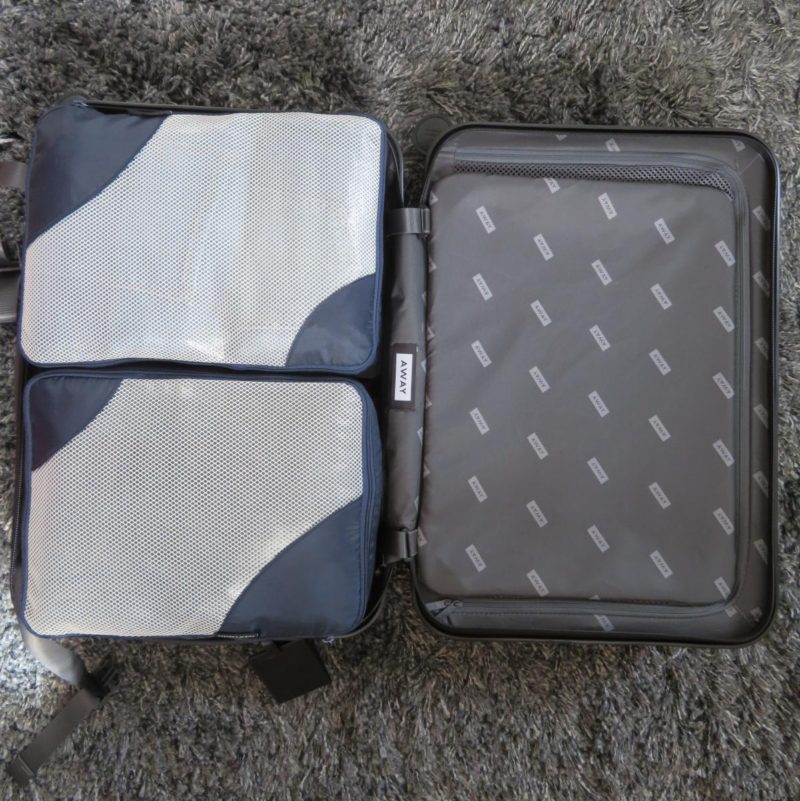
Now comes the fun part! Think of packing your bag like solving a giant jigsaw puzzle. The item that helps me most during this step is packing bags. They are amazing! You can fit so much more into a carry-on using smaller packing bags. They help compress your items and help you keep like items together making it easier to unpack. The key is to get bags that fit together well inside your carry-on to maximize the space. There are a ton of options out there and I have ones from many assorted brands. The main ones I used for this trip (and in the pictures below) are from IKEA and were super cheap. Unfortunately, they are probably 10 years old and I don’t think they sell them anymore. A quick search on good old Amazon will give you tons of options. They are a GREAT present idea and I’ve both given and received packing bags as gifts.
In terms of how to place your clothes inside the packing bags, there seems to be an ongoing debate about rolling versus flat folding. I do both. It really depends on the item and the shape of the packing bag and how much room is in it. Remember, it’s a giant jigsaw. I tend to roll pants (like the left photo below) and bulky items like sweatshirts and flat fold thinner tops and dresses in the shape of the packing bag, so I don’t lose any real estate within the bag. If you go the rolling route and there is some extra space in the packing bag, and you still have an item to pack, lay it flat on top of the rolled items (like the right photo below) to use up all the space. Play around with rolling and flat folding and find out what works for your clothes and your suitcase. Remember to leave space for your toiletries and anything else you need to bring along other than clothes and accessories! If you find that you can’t fit everything inside your carry-on (with space for your toiletries), revisit step 2. If you can’t possibly pare down anymore, maybe you aren’t meant to live the carry-on life for this trip.


After your clothes are in their packing bags and placed snuggly inside your carry-on (leave no space unused!), add your toiletries bag and any other items you need for your trip like makeup or glasses. Always throw in a laundry bag too!
Voila! You now have all the tools to live the carry-on life. Now, I’m not so naive to think you can always get away with a carry-on. I went to Australia and New Zealand for over three weeks last year and had to pack for everything from a hike on a glacier to the brutal outback heat. For that trip, I most certainly did NOT bring just a carry-on. However, I did still follow the process outlined above and ended up using a checked bag smaller than I could have. I also used everything I brought. So even if you need to check a bag, try the above steps to limit lugging around unnecessary items and extra bulk.
If you do need, or want, to check a bag, make sure you still carry-on absolute necessities such as medication. I also suggest a change of clothes and underwear should you find yourself in a situation where your checked bag isn’t available or doesn’t show up.
Happy packing and happy traveling!!
As always, I hope you found this post interesting, informative, inspiring, or entertaining (I’ll take any one as a success). If so, please let me know in the comments section. Also let me know if there is anything you’d like to see on this blog by writing me at feedback@theorganizingblonde.com.
XOXO,
The Organizing Blonde


Leave A Comment