I recently had the absolute pleasure of working on my best friend’s pantry. Having a large, accessible pantry is this organizer’s ultimate dream. Because ours is literally the equivalent of a spice rack behind a door, I was so excited when she said she could use some help. It doesn’t hurt that this project allowed me to spend more time with her and her family. I used to live in their backhouse (how LA is that statement?) before I moved in with the bf so I don’t feel like I see them nearly enough now. They also happen to have the most amazing, scrumptious, beautiful 19-month-old daughter I’ve ever met and I promise I’m not biased…well, maybe a little. But honestly, look at her!

Anyway, back to the pantry. Besides having a household of two adults that work full time plus an irresistible toddler, they are also undertaking a large backyard remodel that includes the aforementioned backhouse and garage. Like basically everyone in the LA area, they don’t use their garage for cars but for storage, so their pantry was awash in non-perishables needing a new home.

I have a few tried and true steps when it comes to organizing any space. The first thing I did, and you should always do, was pull everything out (Clear It) to visually see everything we were working with. Next, I grouped like things together (Sort It) to get a sense of how I would organize the items and so that I could see what they had. Since we were dealing with a pantry, I checked expiration dates and disposed of unnecessary duplicates (Edit It) after asking permission.
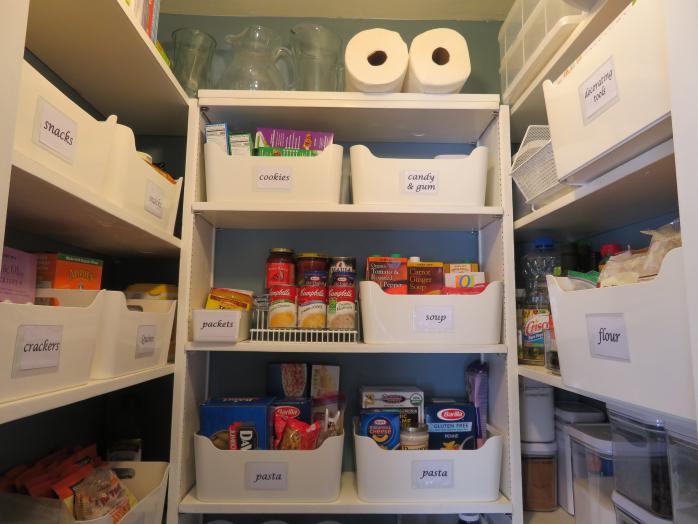
After clearing, sorting, and editing, I brought my friend in to understand what was important to them in the pantry. For instance, she wanted to have more dinner-focused foods within immediate eye-site instead of the candy bin that stared at them when they opened the pantry. She also has a lot of baking items (both tools and ingredients) that she wanted to keep together. Lastly, she wanted to make sure her heavy, extra appliances were on a low shelf (you know, earthquakes and all).
Once I had an idea of what I was working with, and how I was going to store items within the pantry, I started loading like items into these white bins (Contain It) that I got from The Container Store (aka my second home). I love these bins because they are relatively inexpensive, which was good because I needed so many of them, and because they can be used literally anywhere in the house (we even used them in her freezer). I like to go with bins in a pantry for a few reasons: a) they make it easy to find what you need when you need it since all like things are in one place b) similarly, they make it easy to put things away in the right place c) they make shopping easier as you can easily glance at any bin and know if you are running low on those items or not and d) it just makes for a cleaner look.

In addition to the white bins, a tiered can holder was used to visually see any canned or small-bottle goods as well as two sectioned turntables which were used for liquids: one for oils and one for sauces. Both items (the stadium can tier and turntables) are great options to ensure visibility to your items. How many times have you ‘lost’ cans in your pantry because they were behind something else? Or, how many times have you tried to grab the siracha in the back of the shelf only to knock over the sesame oil in front? These items really help relieve those scenarios.
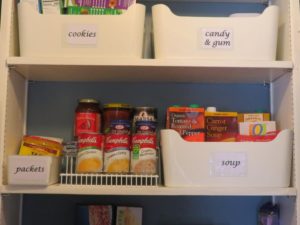

Pop top containers were used for baking staples like flour and sugar as well as cereal. I also used some narrow white containers for seasoning packets and protein/granola bars. Side note on granola bars and other items that come many to a pack: remove the items from their original boxes when storing them. This will allow you to more easily know how many you have. When you have an open box of bars in the pantry you have no idea if you have 5 left in the box or 1 left in the box. But putting them in a bin by themselves gives you an easy view of the number you have and whether you need to restock or not.

Another item I used was this hanging, divided shelf my friend already had in her pantry. We repurposed it to store the manuals and accessories for her mixer and food processor. It was then hung above the appliance shelf ensuring these items were easily accessible when needed.

The last thing I did was label (Label It*) the bins. After discussing options, we went with self-adhesive label holders and printed labels for the white bins. As they use the pantry more, or as their daughter grows up, they might want to switch out the categories of the bins. These label holders allow for that easily as all they need to do is print a new label on the computer, cut it out, and pop it into the label holder. Bing, bang, boom. (*Labeling is not always necessary. I happen to LOVE labels…it might border on being a problem, but they aren’t always necessary or aesthetically pleasing for your space).
After writing this post, my pantry envy has officially returned (although it’s never quite far away). Time to check out Zillow and dream of that large pantry I hope to have one day. One thing is certain though, if I do get a large pantry of my own, it will for sure be organized (with LOTS of labels)!
Before Photos for reference:


As always, I hope you found this post interesting, informative, inspiring, or entertaining (I’ll take any one as a success). If so, please let me know in the comments section. Also let me know if there is anything you’d like to see on this blog by writing me at feedback@theorganizingblonde.com.
XOXO,
The Organizing Blonde
Leave A Comment