When I moved in with my boyfriend, I was probably most excited about having a guest bedroom. OK, I was MOST excited about living with my wonderful boyfriend (and his puppy Cooper) but the guest room was a top draw too. I knew almost immediately that I wanted to create a gallery wall in that room and was enthusiastic to get started.
One of my besties has an amazing gallery wall in her entry hall. Since she started hers, I’ve wanted to copy follow in her footsteps. A gallery wall is a great way to add personal, visual interest to blank walls. Ours also provided an opportunity for my boyfriend and I to intermingle our loved ones, previous adventures, and interests together. Gallery walls can easily look cluttered though, so it’s important to really spend time planning them. I love how ours turned out, so I thought I’d share the process with you (apologies for the glairy shot…trust me it’s great).
-
Pick Your Frames
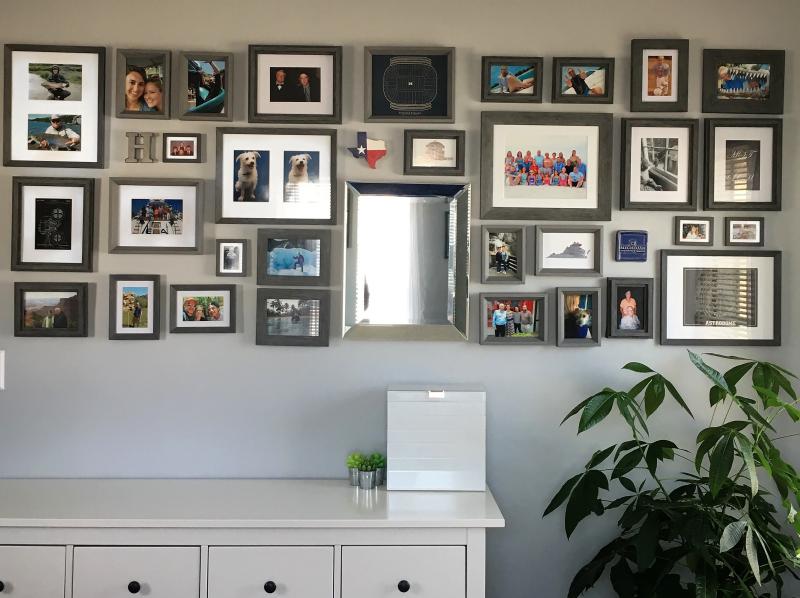
The very first thing I did was shop for frames. I went with grey, wooden frames in assorted sizes. I wanted the frames to go together but not be too matchy-matchy so I ended up with four different styles in various sizes. Of course, the frames I fell in love with were sourced from HomeGoods, T.J. Maxx, and Marshalls so I spent quite a few days running around LA (and even OC) to every one of these stores (some multiple times) searching for the right frames. I don’t necessarily suggest this approach, but I just didn’t LOVE any of the frames at the standard stores I looked at. Any store with a variety of frames (like Michaels, Ikea, Aaron Brothers, Target, etc.) is a great place to start. These stores tend to stock the same frames consistently which will make it easier if you want to add onto your gallery wall in the future.
-
Don’t Limit Yourself to Photos
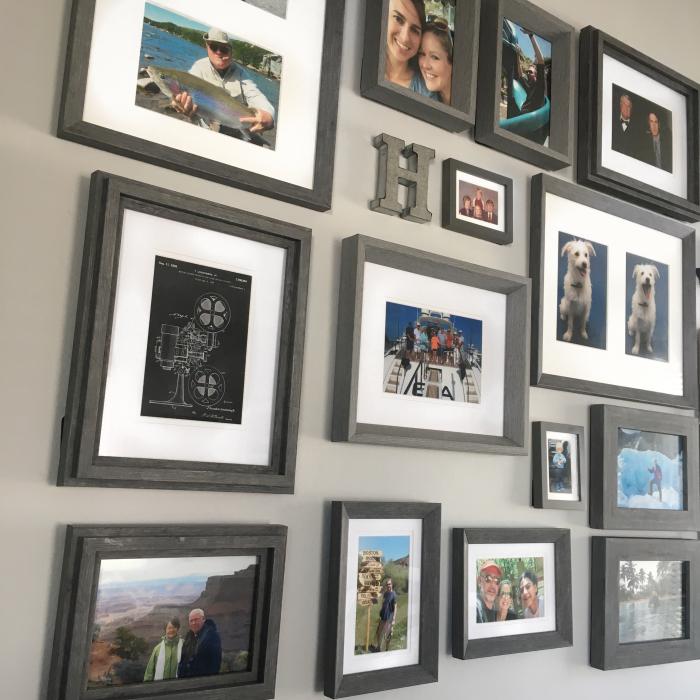
I love a gallery wall that includes more than just photos. Sculptured items add visual interest and is a way to showcase some of your items on the wall instead of on a shelf. My boyfriend is from Houston. If you know anything about Texans, you know that they love to display their Texas pride. So, I knew a wooden shaped Texas painted as the state flag would be a hit with him. My boyfriend’s last name begins with ‘H’ so I found a metal shaped ‘H’ to add into the mix as well.
Besides photos, use some of the frames for artwork. They can be finger paintings from your kids, or a copy of your favorite painting at the Met, or the etched plates used to print your wedding invitations. I used some of the frames to hold artwork I picked up on etsy that represent pieces of ‘us’. I went to the University of Virginia for undergrad and grew up in Northern Virginia, so I have prints representing these aspects of me. In addition, I also went to University of Michigan for my MBA and religiously follow their football program, so I have a print of Michigan Stadium as well. The bf is OBSESSED with the Houston Astros so we also have a print of the old Astrodome which he grew up going to. He works in the film industry so a vintage camera print represents that piece of him. Find art that speaks to you and add it to the mix.
-
Decide on Your Anchor Piece
I knew I wanted to have a mirror as part of the gallery wall and used that as my anchor piece. Your anchor piece can be anything, but it is the piece you will plan the space around. It doesn’t necessarily need to be the largest piece or be destined for the middle of the wall but it’s something to build from.
-
Plan The Space
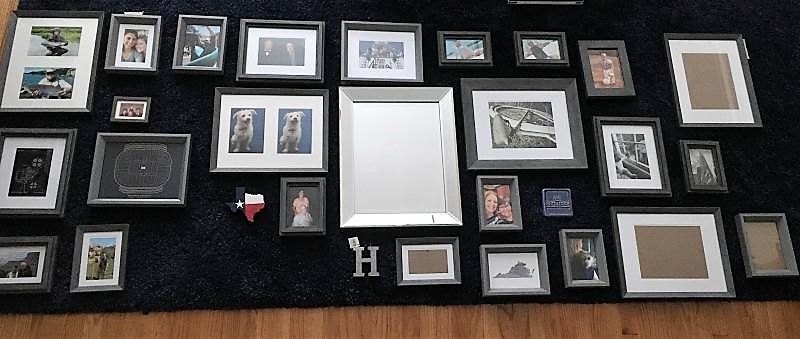
It’s important to plan out your space before you begin banging holes into the wall. I started by measuring out the space of the wall I wanted to use for the gallery wall. Once I had those measurements, I measured out the same dimensions on the floor. I started by placing the anchor piece (in my case, the mirror) in the space I generally wanted it on the wall. I then took my art pieces and frames and started placing them around the anchor piece on the floor until I was happy with the result. Try keeping the space between your frames and art work consistent for a cohesive look. Make sure you take pictures for review or step away from the design to ensure you like the overall look.
-
Fill Your Frames
Once I generally had an idea of how I wanted to design the wall, I started filling the frames with the print art and photos. Don’t let the frame size completely dictate the photo size you use. I used mats to frame smaller sized photos (sometimes two similar photos in a single frame) in some of the frames. The white mats also add additional visual interest and ‘white space’ which reduces the likelihood of a cluttered look.
Pay attention to how you group your photos and art together. I used similar photos where I had two or more of the same frames next to each other. For example, I use the same two frames (one on top of the other) just to the left of the mirror. One of them shows a picture of the bf in his scuba gear off Bali and the other shows me with my winter gear, ice pick, and crampons while on a glacier in New Zealand. I also have two small frames with my bf and I respectively when we were about six years old. It’s neat to have these throw back photos next to each other for comparison.
While filling your frames you might end up moving some of your frames or artwork around (you might also find yourself heading to Target to print different sized photos as well). I did this a lot. It’s an expected piece of the process. You are essentially solving a giant jigsaw puzzle with no guide. It’s also why this step happens before you put any holes in the wall!
-
Create Templates and Hang Your Wall

The last step before hammering nails into the wall is to put the plan on the wall to make sure it works. You can buy some inexpensive brown craft paper (like I did) or use newspaper or old wrapping paper. Cut out rectangles that matched the outside shape of your frames and artwork. Mark the location of the wall hanger on each of the templates so you know where nails need to go once the wall is planned. I also wrote which picture the template represented. Using masking tape, hang the templates on the wall you match the plan you set out in step 4. This is the last opportunity you have to move things around and get your spacing right before the hammer comes out. Once you like what you see, install the anchor piece first. Insert the nail through the paper template per the wall hanger mark. Remove the template from the wall and hang your anchor item. Then move out from the anchor piece (following the same process) hanging one or two items at a time before taking a step back to make sure your spacing is accurate and things are looking as planned. Make any adjustments as necessary while you go.
Before long, you will have your completed gallery wall. And, with all your pre-planning, it should be perfect! If it’s not, do your best to adjust and move along. No one lives in perfect (except maybe Martha).
As always, I hope you found this post interesting, informative, inspiring, or entertaining (I’ll take any one as a success). If so, please let me know in the comments section. Also let me know if there is anything you’d like to see on this blog by writing me at feedback@theorganizingblonde.com.
XOXO,
The Organizing Blonde
Leave A Comment