Somehow my best friend’s daughter just turned two. I’m not sure where the time went as I can still vividly remember holding her at one day old in the hospital after hauling butt up from my job in San Diego. She’s grown into such a sweet, loving little human with the biggest smile and the cutest blonde curls. And although she is still little, she seems to accumulate a bunch of ‘stuff’. Stuff that can start to feel overwhelming, yet stuff that her mom and dad still needs and/or wants to keep. So, in an effort to corral said stuff I took the opportunity of her birthday to make a keepsake box.
I’ve seen similar keepsakes on Pinterest and around the web, so I didn’t come up with an earth shattering new idea worthy of shark tank (unfortunately). But they are super functional, very easy, and fun to create so I thought I’d share my process should anyone want to create one themselves.
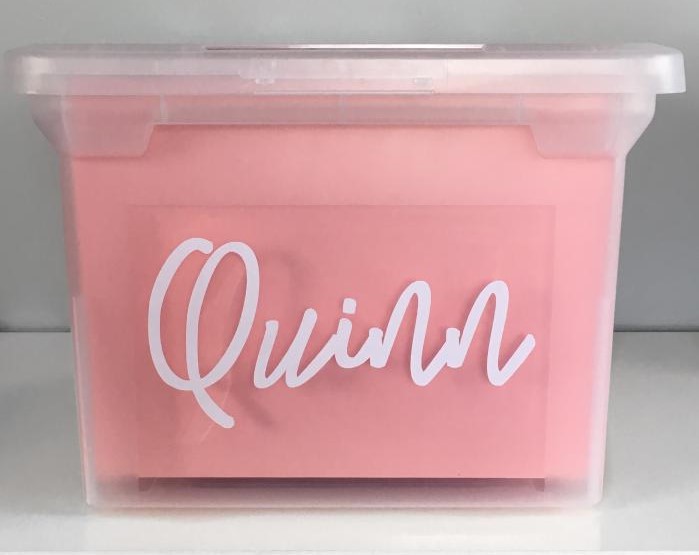
The first thing I did was buy a plastic container made for hanging folders. You can find these in assorted colors, but I went with clear. They come in various sizes and the one I choose is sized to hold both letter and legal sized hanging folders depending on orientation. I liked the flexibility of the clear color and option to store legal and letter size so that the box can be repurposed if it’s ever no longer functional as is.
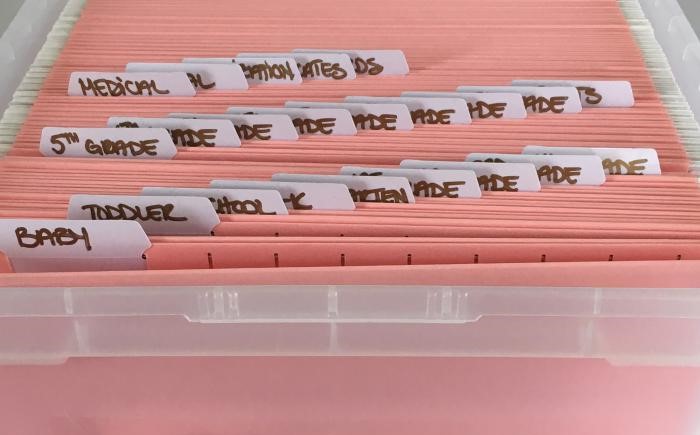
The next thing I did was buy the hanging folders. I choose to orient the keepsake in a way that made the letter size folders the best option but again that’s a personal choice. Little Quinn’s room is white and pink, so I went online and ordered some high quality, light pink hanging folders. I really wanted to get expanding hanging folders to provide more room per folder, but they simply don’t come in light pink. I had to make the hard decision of beauty over function in this case. Because they were standard folders, I went with 50 to fit the container. Since I want this keepsake to last for years, I definitely went with a higher quality folder. Now is not the time to chince on cost unless you want to be replacing the folders in a few years.
Next came the folder labels. The folders came with standard clear tabs and small pieces of paper for labeling purposes and I was all prepared to use those. But, during this process, I found reusable white plastic tabs that are erasable. These labels allow you to use permanent marker (I used a gold sharpie) and if you ever want to change the label, you simply use the enclosed eraser and wipe clean the label for reuse. They seemed of better quality than the standard ones and the labels were clearer to read. In addition, I wasn’t sure my friend wanted the exact labels I created so this gives her an easy option to recreate labels should she want a different system than the one I created. I included about 30 extra labels, the eraser, and the gold sharpie I used inside the box for consistency in the future. In terms of the categories I did use, I created a folder for: baby, toddler, preschool, pre-k, kindergarten, one for every grade through high school, medical, dental, immunizations, certificates, awards, and sports. I’m sure additional categories will emerge as Quinn gets older and there are about 20+ extra folders in the bin for expansion.
Last came the front name label, which of course, was my favorite part. Any time I can use a pretty, vinyl label, I’m all in! To be completely honest, it’s basically the reason I wanted to make the keepsake in the first place. I created this label using my cricut machine (which I’m obsessed with for vinyl labels). You can get a custom label made through Etsy if you don’t have a cricut or similar machine. If you can’t get your hands on a custom vinyl label (or don’t want one), there are other options. You can handwrite the name with a paint pen or print the name on a piece of paper and adhere it to the inside (if the container is transparent) or outside.
So, there you have it. With a little shopping online and an hour or two, you can make your very own keepsake box for your kids, yourself, or as a gift. I think this one came out great and I know Quinn and her Mommy are pretty pleased with it too which makes the effort completely worth it.
As always, I hope you found this post interesting, informative, inspiring, or entertaining (I’ll take any one as a success). If so, please let me know in the comments section. Also let me know if there is anything you’d like to see on this blog by writing me at feedback@theorganizingblonde.com.
XOXO,
The Organizing Blonde
Leave A Comment